Welcome to our Digital Banking Information Page
- Getting Started - Enrolling, Logging In, and Device Registration
- Move Money - Transfer Money, Pay a Loan, Pay Bills, Customer to Customer
- General Help - Online Banking How-To's
- Features and Customizations - Customization Features and New Functions
- Quickbooks, Quicken and Mint Users - Conversion information and instructions
Getting Started
- Select the blue login tab in the menu bar of our website
- The drop down will say Digital Banking Login for both logging in as a consumer or a business
- Enter your current username and password
- You will be presented with a Secure Access Code (SAC) screen, asking you to choose the delivery method for your one-time use SAC. If you are unable to access any of the contact methods listed, please contact us to have your contact information updated in our system.
- If this is your first time logging in, you will be asked to establish your new login credentials. You may use your old password if it meets the new security requirements listed.
- You will be given a choice to have our system remember your device. If you select "Register Device," you will not be asked to enter a SAC code for future login from that device (new device logins will still require an SAC code). We do not recommend this on a public computer or shared device.
- Start banking!
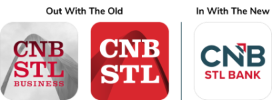
- Download the new CNB St. Louis Bank app from your app store


- The old apps have different icon that our new, upgraded app, so be sure your app is updated by verifying you have the correct icon:
- Enter your current username and password
- You will be presented with a Secure Access Code (SAC) screen, asking you to choose the delivery method for your one-time use SAC. If you are unable to access any of the contact methods listed, please contact us to have your contact information updated in our system.
- If this is your first time logging in, you will be asked to establish your new login credentials. You may use your old password if it meets the new security requirements listed.
- You will be given a choice to have our system remember your device. If you select "Register Device," you will not be asked to enter a SAC code for future login from that device (new device logins will still require an SAC code). We do not recommend this on a public computer or shared device.
- Start banking!
- Must be between 8 and 16 characters
- Must contain at least 1 number
- Must contain a minimum of 1 lower case character
- Must contain a minimum of 1 upper case character
- May not contain the following characters: < > &
- Settings
- Security Preferences
- Secure Delivery
- Registering your device means you will not need to input a secure access code each time you log in.
- The SAC process is required each time you log into Digital Banking on a different device for the first time. So, the first log in on a desktop computer and the first log in on your mobile device both require a SAC.
- Do not register a device to your account if you are using a public computer or someone else's device.
- If you lose a device that you have previously registered, please contact us at (314) 645-0666 to remove the device registration.
- If you need to remove a device registration for any reason, please call us at 314-645-0666, and we can take care of that for you.
It's easy to reset your password with Digital Banking.
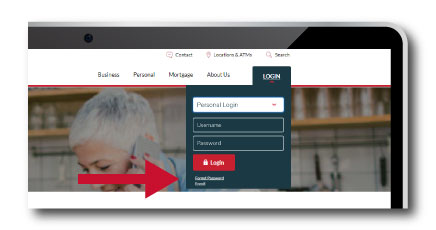
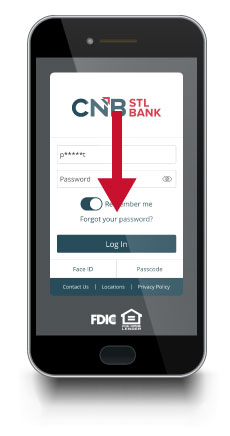
- Click on Forgot Password (see screenshots below for where to find this)
- Enter Your Login ID
- Click Submit
- Select Your Secure Access Code Target
- Enter Your Secure Access Code (from your text or call)
- Click Submit
- Enter A New Password
- Click Submit
- From the main menu choose Move Money
- Pay Bills
- Here, in the Quick Bill Pay screen you can add payees and schedule payments
- For more features and functionality, click the button to "Go to the Full Bill Pay Site"
Pro Tip: Looking for more bill pay features? The upgraded system placed the most commonly used features front and center. All of the advanced functions you may be familiar with, such as setting up auto-pays, viewing eBills, nicknaming payments, and viewing account number information are still available by clicking the “Go to the Full Bill Pay Site” button on the Pay Bills screen.
- From the menu, choose Manage External Accounts
- Add External Account
- Follow the two step process:
- Step 1: Add Your Account
Input the account number, account type, and bank routing number - Step 2: Verify Your Account
You will be sent micro-deposits (deposits under $1) as a way to verify your account information. Once the micro-deposits are received in your external account, you will input the dollar amounts to verify the account. Once the account is verified, you will see the account on your home page, in your drop-down account list for sending transfers, and in your financial management tools.
- Step 1: Add Your Account
- From the main menu, select Transfer Money
- Select your "From" account, "To" account, and dollar amount of the transfer
- Choose the transfer frequency and date
- Optional: Add a memo to the transfer for your records
- Click Transfer Funds
- First, you must add the external account. See Add External Account in the previous section
- Once you complete the two-step process for adding and verifying an external account, you may follow the above instructions for setting up an internal transfer, only now your external account will show up as an option in your "To" and "From" account drop-down menus.
- From the main menu, select Digital Banking Activity
- Click the Recurring Transactions tab
- Click on any recurring transaction to view the details
- From the main menu, select Pay & Transfer
- Choose Pay a Loan
- Follow the on-screen instructions
- From the main menu, select Statements & Reports
- View Statements
- Select the account, date, and document type
- Click Get Statement to download a pdf copy of your statement
- From there, you may save your statement on your computer or print it
- Option 1
Users can download their e-statements using the mobile app or try another non-Chromium browser such as Internet Explorer or Firefox. - Option 2
Instead of clicking the download button when viewing the PDF in a browser, users can click the print button and then use the Print to PDF feature if they have Adobe. This will use the Print workflow to save the PDF to their device, the same way downloading it does. After it is saved, you may open the pdf document and print from there. - Option 3
Disable the option "Download PDF files instead of automatically opening them in Chrome":- Open Google Chrome.
- Click on the Menu icon in the top-right corner of the window.
- Click Settings.
- In the Search settings bar type "Site Settings".
- Click on Site Settings in the results.
- On the Site Settings page, scroll down to the Content section and expand Additional Content Settings.
- Click PDF documents.
- Change the Download PDF files instead of automatically opening them in Chrome option from the off position (grey) to the on position (blue).
- Close the Settings tab and restart your browser.
- From the main menu, select Statements & Reports
- Statement Delivery
- Click the pencil icon to edit the statement delivery type for each account
- The first time you select e-Statement as a delivery method for your statement on an account, you will be asked to accept our e-Statement Delivery Agreement.
- Select Profile and Settings from the Main Menu
- Account Preferences
- Here you can change the following information:
- Password
- Secure Delivery Methods (Email Address, SMS Text Number, and Voice Number)
- Password
- From the home page, click on the account tile
- Click on the Details & Settings tab (next to the word Transactions)
- See balances, last deposit, year-to-date interest, and more!
- Set nickname/display name, home screen visibility, and financial tools visibility for the account
- Click the Forgot Password link (see screen shots below)
- Enter Your Login ID
- Click Submit
- Select your Secure Access Code delivery method
- Retrieve your Secure Access Code (from your text/email/voice call) and enter it
- Click Submit
- Enter your new password
- Click Submit
Forgot Password Link on Desktop or Laptop:

Forgot Password Link on Mobile Device:

Need help more help digitally? There are many different ways you can reach out to us from inside the Digital Banking platform quickly and securely.
For questions regarding specific accounts:
- Click on the account tile for the account in question.
- Click on the the "kebob icon" next to the account ---> ⋮
- Click Ask a question.
- Type your question.
- Click Send message.
- From the main menu, select Messages.
- Click on the blue circle with a white pencil in the middle to start a new message.
- Follow on screen instructions.
- The "kebob icon" next to the account ---> ⋮
- Settings
- Scroll down to Account Visibility, and turn it on or off using the green sliders. Here, you can also change the account display name.
Want to categorize your accounts into groups? It's so easy to do:
- Click, hold and drag the "Account Tile" (The whole box around the account name/information) to the bottom right. This will make an inbox icon appear:
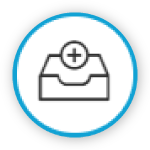
- Drop the Account Tile onto this icon. A new group will appear.
- Rename the New Group
- Click the check mark to save.
It is really easy to customize (nickname) your account name by clicking:
- The "kebob icon" next to the account ---> ⋮
- Nickname Account
- Fill in your new Account Nickname in the box
- Save
- Services
- Alerts
- + New Alert
Let our financial tools help you with your personal financial management. Here, you can budget and manage your finances across multiple financial institutions – see your spending, budget, trends, cash flow and more.
Access Financial Tools
- Click Financial Tools above your Accounts section.
- From here you can select many different tools including Net Worth, Budget, Spending Habits, and many more!
- Click Home.
- Click on the "kebob" three vertical button icon on the account tile for the account you wish to hide. ---> ⋮
- Click Settings.
- Click the blue circle checkmark next to Financial Tools (turning it to a gray X).
With your CNB St. Louis Bank Debit Card and CardSwap, you can change or update the payment info for a number of subscriptions and/or digital services, all in one place, with one click!
- In the Menu, select Services & Statements.
- Click CardSwap. A new screen will open.
- Click Get Started.
- You will need to Read and Accept the Terms & Conditions the first time.
- Follow on screen instructions.

